Hi,
Welcome to the community! 
In fact, your sketch made my computer crash for a moment  too much memory pressure on my 8GB RAM. You don’t need to redraw the same image at each
 draw() loop so you can use noLoop() to stop the loop at the end of the draw function.
I think that your approach is not the best solution to achieve this result. By putting three points for every pixel, you get this spiky, triangle shape every time. And if the amplitude is really high, it’s overlapping a bit.
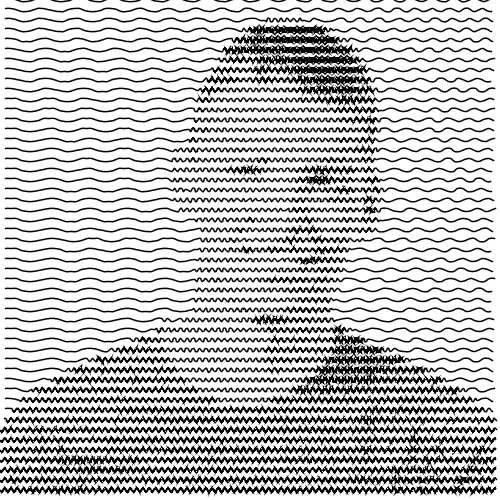
You can see that on the picture, this is a continuous curve with a sine shape. This implies that you need to use curveVertex() instead of vertex() to have a smooth line. Also, a single oscillation can spread on multiple pixels when the brightness is high so having points per pixel doesn’t work.
The basic idea is this :

So darker pixels gives more high frequency sine waves. In order to do this, you need to put more points in the darker areas otherwise the resolution will not be enough. This is the opposite when there’s bright pixels, spreading the points give elongated curves. So in fact, the number of vertices for a given pixel is variable.
Now let’s compare those two graphs :


The left one is the basic y = sin(x) an the second one is y = sin(x * x). For the second curve, as soon as we increase in the positive x direction, the frequency increase because we square x.
This is to show that if we vary x in a non linear way (not the first graph), we can dynamically vary the frequency of the curve.
You might also want to take into account the gap between the sine curves so they don’t overlap.
Here is a Processing code in Java to do that :
PImage portrait;

// Frequency of the waves multiplier
float sineIncr = 0.1;

// Height of the waves
float sineHeight = 10;

// The space between the curve rows
float spaceBetweenRows = 3;

void setup() {
  size(500, 500);

  portrait = loadImage("portrait.png");
}

void draw() {
  background(255);

  // Modify the stroke to have larger lines
  strokeWeight(1.5);

  portrait.loadPixels();

  // For every rows multiple of sineHeight
  for (int y = 0; y < portrait.height; y += sineHeight) {
    beginShape();
    // We start with a position of 0 for the sine function
    // Think of it as the x on the graphs
    float sinePos = 0;

    // Go until it fills the width
    while (sinePos < width) {
      // We have multiple points per pixel
      // So we have to pick the closest point for a x coordinate by rounding it
      int closestPixelLoc = round(sinePos) + y * portrait.width;

      // Compute the brightness of that pixel in [0, 1]
      float br = brightness(portrait.pixels[closestPixelLoc]) / 255.0;

      // The sine wave is oscillating above and under the pixel height
      curveVertex(sinePos, y + sin(sinePos) * (sineHeight / 2 - spaceBetweenRows));

      // We increase the x position of the sine wave
      // We use an exponential function to vary faster when the pixel is brighter
      sinePos += exp(br * 4) * sineIncr;
    }
    endShape();
  }

  // Break the loop
  noLoop();
}
In this code, I use the exponential function to increase the frequency a lot faster when the pixels are bright so it gives a non uniform look!
This is not perfect (there’s artifacts, it’s due mostly to the canvas resolution and curve detail…) but it works quite well. This is not in JavaScript but it’s easy to adapt to p5.js and it’s going to make you read and understand the code rather than copy pasting
Have fun (I had too  )!
)!