Curve density over an image

I’m curious how I might approach loading a high-contrast image and then creating lines/curves to that are more densely overlapped in the dark areas, to recreate something like this…

I’m fairly adept at understanding the pixel matrix of an image, but not sure how to approach drawing messy lines that are more or less dense depending on the underlying pixel values.

Any guidance is much appreciated!

2 Likes

Could this approach be useful for you?

2 Likes

Ahh, yes… that is very close to what I’m looking to do! I don’t quite understand the logic behind his algorithm, but I’ll walk through it line by line and see if I can follow. Thanks for the heads up, I haven’t messed with Processing in a while and I forgot about openprocessing.org! Any other good reference/example sites to check out?

Thanks!

At a lower level (texture) you might be interested in Handy and p5.scribble:

You could look into using a PShader – perhaps by browsing shadertoy.com for keywords like scribble, scrawl, hand-drawn, drawing, pencil, pen, charcoal etc.

In general, you might also be interested in looking into some recent impressive CGI rendering techniques called “style transfer”, which specifically maps a hand-drawn style onto a photograph or model.

Edit: for more on style transfer resources for Processing, see:

3 Likes

Thank you! Great info… much appreciated!

I’m still interested in the question of a simple algorithm to approach the sketching of the top image. The most obvious is to use random curve generation,

…seeding those curve points from a weighted distribution of the pixels by brightness. However, that will tend to randomly connect dark points anywhere on the image.

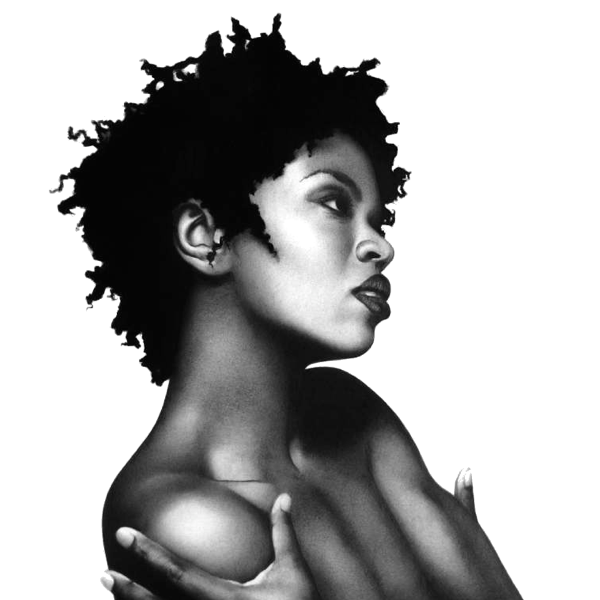
By contrast, it looks like the artist has a few long lines, more medium length lines, and many short lines (or, if you prefer, lengths of continuous curves that are more compact rather than ranging widely. Some regions are loose and some regions are tight – the ear on the right-hand margin, for example, is very tightly rendered with small strokes, while the shadows on the left are treated like one region.

Such a constraint could be added by only picking curve points from a selected “area of attention” and drawing some number of curves within those bounds before changing the attention frame.

In addition, the artist is careful to seldom cross certain key areas that must remain bright values – e.g. the bridge of the nose and the highlights on the cheek – even though they are surrounded by dark. This might be managed by testing and pruning crossings – or perhaps by generating curves blindly and then testing the result to see if it is closer to or further from the reference image.

One interesting aspect of the drawing is that high energy curves pass outside the main drawn area and return into it – for example, around the ears, or that the head stops before getting to the chin, but we see lots of curve action down there with no form, like smoke. If the algorithm was working from a photo, it might apply a one or more transparency gradients to the image before processing it to create these fade-out edges on a subject.

Finally, and this gets at something such a naive algorithm cannot reproduce, the aggregate roundness of the curves tracks the contours of the face in a way that hints topographically at 3D information that isn’t necessarily in a 2D painting or photo – the roundness of the lip, the hollow of the cheekbone, etc. Many individual curves are scribbles, but some serve sculptural purposes – such as the one dramatic line that crosses the forehead. The sketch also contains a few decisive hard lines – such as the edge of the ear – which are not shade filling at all, but drawing, and would require a different algorithm.

2 Likes

I spent some time over the weekend working on an idea to accomplish this. It still needs a lot of work, but I think it has potential!

2 Likes

Very nice! Interesting use of multiple line colors.

Great results on highlights like the face and shoulder. Are you using a random walkers to pick very-nearby curve points with a probability of the next point based on the darkness of that region? The nose / lip lines around the right edge of the face aren’t quite right, but they are surprisingly disciplined for a scribble algorithm.

1 Like

Basically, I’m iterating over each pixel in the image and storing a mapped brightness value in a 2d array of 0’s and 1’s. I do this a few times for different levels of brightness, so I end up with 3 or 4 2d arrays of x,y coords.

Then, and this part clearly needs optimization, I generate millions of coordinate locations. If the coordinates are also marked as 1 in the array, I add a curveVertex to the shape. This is wasteful from a cpu perspective, but provides a lot of randomness in the sketch, which I like.

I run the algorithm a few times for varying levels of brightness and layer the curves on top of each other with a little transparency.

Still needs a lot of refinement, but I’m digging the direction thus far!

Andre 3000 from Outkast :slight_smile:

2 Likes

Hi stirman,

Really nice work so far! love the result :slight_smile:

I had an idea reading @jeremydouglass: maybe you can process your image in different ways to extract some key informations and use the data from all those processed image to run your algorithm.

I was mainly thinking of an “edge detection” image that could helps some lines following key features of the original picture :thinking:

2 Likes

Been improving this algorithm and I bought an Axidraw (pen plotter) to draw these on paper!

18%20AM 43%20AM

5 Likes

I’m really impressed! The result is super good!

What is the dimension of your real life canvas? And how long does it take to render it (with the pen machine)?

The plotter can draw up to A3 paper size (11" x 17"), but this 2Pac plot is 11" x 11".

The plots take between 30-60 minutes, usually depending on how much I want the black saturated. Really loving making these :slight_smile:

1 Like

Wow, I really love this project!

I haven’t read through the many links above yet, but I’m wondering if your method could be used to batch process the frames of a video to make a video of these sorts of drawings?

Not to suggest any additions to your project, of course; it’s really amazing as is!
Very inspiring work!

Thanks Dan!

Yeah, I could probably extrapolate the code to process frames of a video, but for now I’m focused on framed art as I’m showing a collection of these at a SF art show in a couple weeks :slight_smile:

1 Like

This is very impressive. I think I’ve tried to reach out to you on reddit at some point. Would you please share info on your exhibit? I’m also in SF and would like to see your artwork in person if possible.
Thanks.

Heyo! Sorry, didn’t see the message on reddit. Here’s a link to the art show in SF, and you can see more of my scribble portraits here.

I came up with my own algorithm to do these scribbles and it’s crazy inefficient, but it still only takes ~10 seconds to draw a portrait, so I’m not stressing about it. Happy to explain the logic in more detail and have been considering writing a Medium post about it.

Would love to see you at the show and I can explain the logic in person :slight_smile:

2 Likes

I did some work using a related approach with Processing a few years ago which produces a similar effect. Works reasonably well for some portraits but also creates quite nice architectural sketches.

sketch

(BTW, I am also the author of the Handy Processing library linked in the post above).

4 Likes

Here’s an example of applying the same technique to a building. The overshooting of the Catmull Rom splines emphasises the vanishing points of the perspective projection producing a nice ‘construction lines’ effect.

5 Likes

Beautiful, and Handy is really cool!