Why does my Arduino code not register data from Processing?

I am trying to control a 32x32 led matrix display using Processing. My Arduino code works fine, as far as i can tell. It can interact with my display and if i send text using the Arduino IDEs serial monitor, the LEDs light up in a deterministic fashion. I can also see the Arduinos Rx indicator LED light up. If, however, i send any data from my processing script, the Rx LED flashes, meaning that the Arduino received something, but i do not see any output on my display.

What did i do wrong?

here is my arduino and processing code:

#include "GyverMAX7219.h"

MAX7219< 4, 4, 9 > mtrx;

bool bits[1024];

void setup() {
  Serial.begin(9600);
  mtrx.setType(GM_SERIES);
  mtrx.begin();       // run
  mtrx.setBright(0);  // brightness 0..15
}

void loop() {
  loadData();
  renderData();
}


void loadData() {
  int n = 0; //location in bits[] to write to
  if (Serial.available()) {
    for (int i = 0; i < Serial.available(); i++) { //for each UART byte
      byte currentByte = Serial.read(); //store the current UART byte
      for (int j = 0; j < 8; j++) { //for each bit in the current UART byte
        bits[n] = bitRead(currentByte, 7 - j); //add the current bit to bits[]
        n++;
      }
    }
  }
}

void renderData() {
  for (int x = 0; x < 32; x++) {
    for (int y = 0; y < 32; y++) {
      mtrx.dot(x, y, bits[x * 32 + y]);
    }
  }
  mtrx.update(); //update the display
}
Serial display;

void setup() {
  println("Available ports:");
  printArray(Serial.list());  
  display = new Serial(this, Serial.list()[0], 9600);
}

void draw() {
  display.write((int)random(10));
  delay(100);
}
1 Like

Hi @REK166, You’ve said it works correctly when you enter text in the serial monitor (SM), but the .write(int(random(10)) will send a single byte of value 0…10. Suppose you send A from the SM it displays A?
Change your processing code to send .write(65) (or 66 etc.) Does that work?

Whatever you want to send, needs to be text. To convert the random number to text.

String s;
s = String.format("%d", (int) random(10));
println(s);
display.write(s);

I haven’t tested this in with an Arduino, but can if needed. Let me know.

1 Like

If you read the loadData() function in my arduino code, you will see that i don’t want to render the text, but actually want to display each bit of the input as one dot on the display. This way there should always be some output on the display whatever i send, but there isn’t

1 Like

Hello @REK166 ,

The code below will:

  • send a byte array of data to the Arduino
  • Arduino will send received data back
  • Processing will display data in console
Processing Code < Click here to open!
// 16*16 Display
// 16*16 = 256 bits
// 2 bytes * 16 rows = 32 bytes to store the 256 bits

import processing.serial.*;
Serial display;

// https://docs.oracle.com/javase/8/docs/technotes/guides/language/binary-literals.html
// I wanted to see pattern with 0 and 1 and did not want to add (byte) to each value:
// An 8-bit 'byte' value:
// byte aByte = (byte) 0b00100001;

int [] data = {  0b11111111, 0b11111111,
                 0b10101010, 0b10101010,
                 0b10101010, 0b10101010, 
                 0b10101010, 0b10101010, 
                 0b10101010, 0b10101010,  
                 0b10101010, 0b10101010,  
                 0b10101010, 0b10101010,
                 0b10101010, 0b10101010,
                 0b10101010, 0b10101010, 
                 0b10101010, 0b10101010, 
                 0b10101010, 0b10101010, 
                 0b10101010, 0b10101010, 
                 0b10101010, 0b10101010,  
                 0b10101010, 0b10101010,  
                 0b10101010, 0b10101010,
                 0b11111111, 0b11111111,
                 };
                 
byte [] byteData = new byte [2*16]; // Used later to convert int data array to a byte array
                 
void setup()
  {
  size(320, 320);
  
  printArray(Serial.list());
  
  // Create byte array
  for(int i=0; i<data.length; i++)
    {
    byteData[i] = (byte)(data[i]);
    //println(binary(byteData[i], 8)); // Debug
    }
  
  display = new Serial(this, Serial.list()[0], 9600);
  //display.stop();
  //display = new Serial(this, Serial.list()[0], 9600);
  delay(500);   // Wait for Arduino to reboot and be ready 
  }
  
void draw()
  {
  while (display.available() > 0)
    {
    int currentByte = display.read();
    //println(currentByte);
    print((char) currentByte);
    }
  }
    
void keyPressed()
  {
  display.write(byteData);   
  }

Arduino Code < Click here to open!
// #include "GyverMAX7219.h"

// MAX7219< 4, 4, 9 > mtrx;

bool bits[256];

void setup() {
  Serial.begin(9600);
  // mtrx.setType(GM_SERIES);
  // mtrx.begin();       // run
  // mtrx.setBright(0);  // brightness 0..15
}

void loop() {
  loadData();
  //renderData();
}

int n = 0;

void loadData() {
  //int n = 0; //location in bits[] to write to
  if (Serial.available()) {
    for (int i = 0; i < Serial.available(); i++) { //for each UART byte
      byte currentByte = Serial.read(); //store the current UART byte
      for (int j = 0; j < 8; j++) { //for each bit in the current UART byte
        bits[n] = bitRead(currentByte, 7 - j); //add the current bit to bits[]
        Serial.print(n);
        Serial.print(',');
        //Serial.print(bits[n]);
        Serial.println();                
        n++;
       if(n >=256) n = 0;
      }            
    }
  }
}

// void renderData() {
//   for (int x = 0; x < 32; x++) {
//     for (int y = 0; y < 32; y++) {
//       mtrx.dot(x, y, bits[x * 32 + y]);
//     }
//   }
//   mtrx.update(); //update the display
//}

The above code worked here if you are connected to the correct COM port.

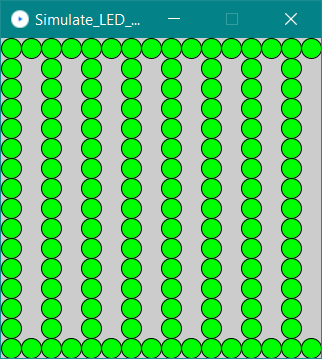
I even went as far as simulating (code not provided) on Processing to display it:

image

I have worked with such similar displays and code in the past and familiar with this.

This was code that I wrote quickly for a morning workout.

Please scrutinize the code to see what changes I made and try to understand why.

I often write a simulation and loop back data from Arduino to Processing for development.

For more complex systems and monitoring of data I will use another COM port.

I often use this terminal in place of the limited Arduino terminal:

:)

1 Like

@REK166. I did read your ‘LoadData’ but not having the same display as you I didn’t pursue that line.
Did you try the write(65)? and is it the same as entering ‘A’ on the Serial Monitor (SM)?

SM is slightly annoying as you have to click ‘Send’ each time. Putty (putty.exe) is more responsive (and fun).

These lines

  if (Serial.available()) {
    for (int i = 0; i < Serial.available(); i++)

are puzzling me, because I think you are only sending 1 byte. If there were e.g. 10 bytes i would be counting up, available() counting down, they would meet at 5 and ignore the last 5 bytes. But then they would be seen the next time round. I think a single test would be more reliable:

while (Serial.available()) {

I think I’ve seen somewhere that the Ard serial hardware needs a moment to recover between requests. Think the end of loop() should have ‘delay(1)’.

Do you really want to renderData() repeatedly as fast as possible? You could make loadData() return a flag to indicate that there is new data.

You could make the Ard send serial data back to SM/Processing/Putty to indicate progress (as @glv) This can be useful but can also introduce more confusion between binary and text. Again as @glv says, another com port is useful. What Arduino do you have? Do you have a ttl-usb?