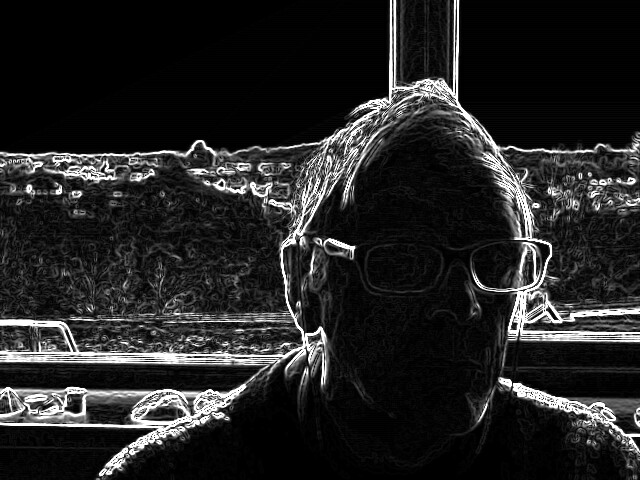
With difficulty I would say, you could perhaps start with applying an edge detecting glsl shader:-
#ifdef GL_ES
precision highp float;
#endif

uniform sampler2D texture; // iChannel0 in Shadertoy
uniform vec2 sketchSize; // iResolution in Shadertoy

#define EDGE_FUNC edge

//options are KAYYALI_NESW, KAYYALI_SENW, PREWITT, ROBERTSCROSS, SCHARR, or SOBEL
#define SOBEL

// Use these parameters to fiddle with settings
#ifdef SCHARR
#define STEP 0.15
#else
#define STEP 1.0
#endif


#ifdef KAYYALI_NESW
const mat3 kayyali_NESW = mat3(-6.0, 0.0, 6.0,
                               0.0, 0.0, 0.0,
                               6.0, 0.0, -6.0);
#endif
#ifdef KAYYALI_SENW
const mat3 kayyali_SENW = mat3(6.0, 0.0, -6.0,
                               0.0, 0.0, 0.0,
                               -6.0, 0.0, 6.0);
#endif
#ifdef PREWITT
// Prewitt masks (see http://en.wikipedia.org/wiki/Prewitt_operator)
const mat3 prewittKernelX = mat3(-1.0, 0.0, 1.0,
                                 -1.0, 0.0, 1.0,
                                 -1.0, 0.0, 1.0);

const mat3 prewittKernelY = mat3(1.0, 1.0, 1.0,
                                 0.0, 0.0, 0.0,
                                 -1.0, -1.0, -1.0);
#endif
#ifdef ROBERTSCROSS
// Roberts Cross masks (see http://en.wikipedia.org/wiki/Roberts_cross)
const mat3 robertsCrossKernelX = mat3(1.0, 0.0, 0.0,
                                      0.0, -1.0, 0.0,
                                      0.0, 0.0, 0.0);
const mat3 robertsCrossKernelY = mat3(0.0, 1.0, 0.0,
                                      -1.0, 0.0, 0.0,
                                      0.0, 0.0, 0.0);
#endif
#ifdef SCHARR
// Scharr masks (see http://en.wikipedia.org/wiki/Sobel_operator#Alternative_operators)
const mat3 scharrKernelX = mat3(3.0, 10.0, 3.0,
                                0.0, 0.0, 0.0,
                                -3.0, -10.0, -3.0);

const mat3 scharrKernelY = mat3(3.0, 0.0, -3.0,
                                10.0, 0.0, -10.0,
                                3.0, 0.0, -3.0);
#endif
#ifdef SOBEL
// Sobel masks (see http://en.wikipedia.org/wiki/Sobel_operator)
const mat3 sobelKernelX = mat3(1.0, 0.0, -1.0,
                               2.0, 0.0, -2.0,
                               1.0, 0.0, -1.0);

const mat3 sobelKernelY = mat3(-1.0, -2.0, -1.0,
                               0.0, 0.0, 0.0,
                               1.0, 2.0, 1.0);
#endif

//performs a convolution on an image with the given kernel
float convolve(mat3 kernel, mat3 image) {
    float result = 0.0;
    for (int i = 0; i < 3; i++) {
        for (int j = 0; j < 3; j++) {
            result += kernel[i][j]*image[i][j];
        }
    }
    return result;
}

//helper function for colorEdge()
float convolveComponent(mat3 kernelX, mat3 kernelY, mat3 image) {
    vec2 result;
    result.x = convolve(kernelX, image);
    result.y = convolve(kernelY, image);
    return clamp(length(result), 0.0, 255.0);
}

//returns color edges using the separated color components for the measure of intensity
//for each color component instead of using the same intensity for all three.  This results
//in false color edges when transitioning from one color to another, but true colors when
//the transition is from black to color (or color to black).
vec4 colorEdge(float stepx, float stepy, vec2 center, mat3 kernelX, mat3 kernelY) {
    //get samples around pixel
    vec4 colors[9];
    colors[0] = texture2D(texture,center + vec2(-stepx,stepy));
    colors[1] = texture2D(texture,center + vec2(0,stepy));
    colors[2] = texture2D(texture,center + vec2(stepx,stepy));
    colors[3] = texture2D(texture,center + vec2(-stepx,0));
    colors[4] = texture2D(texture,center);
    colors[5] = texture2D(texture,center + vec2(stepx,0));
    colors[6] = texture2D(texture,center + vec2(-stepx,-stepy));
    colors[7] = texture2D(texture,center + vec2(0,-stepy));
    colors[8] = texture2D(texture,center + vec2(stepx,-stepy));

    mat3 imageR, imageG, imageB, imageA;
    for (int i = 0; i < 3; i++) {
        for (int j = 0; j < 3; j++) {
            imageR[i][j] = colors[i*3+j].r;
            imageG[i][j] = colors[i*3+j].g;
            imageB[i][j] = colors[i*3+j].b;
            imageA[i][j] = colors[i*3+j].a;
        }
    }

    vec4 color;
    color.r = convolveComponent(kernelX, kernelY, imageR);
    color.g = convolveComponent(kernelX, kernelY, imageG);
    color.b = convolveComponent(kernelX, kernelY, imageB);
    color.a = convolveComponent(kernelX, kernelY, imageA);

    return color;
}

//finds edges where fragment intensity changes from a higher value to a lower one (or
//vice versa).
vec4 edge(float stepx, float stepy, vec2 center, mat3 kernelX, mat3 kernelY){
    // get samples around pixel
    mat3 image = mat3(length(texture2D(texture,center + vec2(-stepx,stepy)).rgb),
                      length(texture2D(texture,center + vec2(0,stepy)).rgb),
                      length(texture2D(texture,center + vec2(stepx,stepy)).rgb),
                      length(texture2D(texture,center + vec2(-stepx,0)).rgb),
                      length(texture2D(texture,center).rgb),
                      length(texture2D(texture,center + vec2(stepx,0)).rgb),
                      length(texture2D(texture,center + vec2(-stepx,-stepy)).rgb),
                      length(texture2D(texture,center + vec2(0,-stepy)).rgb),
                      length(texture2D(texture,center + vec2(stepx,-stepy)).rgb));
    vec2 result;
    result.x = convolve(kernelX, image);
    result.y = convolve(kernelY, image);

    float color = clamp(length(result), 0.0, 255.0);
    return vec4(color);
}

//Colors edges using the actual color for the fragment at this location
vec4 trueColorEdge(float stepx, float stepy, vec2 center, mat3 kernelX, mat3 kernelY) {
    vec4 edgeVal = edge(stepx, stepy, center, kernelX, kernelY);
    return edgeVal * texture2D(texture,center);
}

void main( void ){
    vec2 uv = gl_FragCoord.xy / sketchSize.xy;
    vec4 color = texture2D(texture, uv.xy);
#ifdef KAYYALI_NESW
    gl_FragColor = EDGE_FUNC(STEP/sketchSize[0], STEP/sketchSize[1],
                            uv,
                            kayyali_NESW, kayyali_NESW);
#endif
#ifdef KAYYALI_SENW
    gl_FragColor = EDGE_FUNC(STEP/sketchSize[0], STEP/sketchSize[1],
                            uv,
                            kayyali_SENW, kayyali_SENW);
#endif
#ifdef PREWITT
    gl_FragColor = EDGE_FUNC(STEP/sketchSize[0], STEP/sketchSize[1],
                            uv,
                            prewittKernelX, prewittKernelY);
#endif
#ifdef ROBERTSCROSS
    gl_FragColor = EDGE_FUNC(STEP/sketchSize[0], STEP/sketchSize[1],
                            uv,
                            robertsCrossKernelX, robertsCrossKernelY);
#endif
#ifdef SOBEL
    gl_FragColor = EDGE_FUNC(STEP/sketchSize[0], STEP/sketchSize[1],
                            uv,
                            sobelKernelX, sobelKernelY);
#endif
#ifdef SCHARR
    gl_FragColor = EDGE_FUNC(STEP/sketchSize[0], STEP/sketchSize[1],
                            uv,
                            scharrKernelX, scharrKernelY);
#endif
}
JRubyArt sketch doing video capture:-
load_library :video, :video_event
include_package 'processing.video'
attr_reader :cam, :my_shader

def setup
  sketch_title 'Edge Detect Capture'
  @my_shader = load_shader(data_path('edge_detect.glsl'))
  # @my_shader = load_shader('edge_detect.glsl') # require --nojruby flag
  # @my_shader = load_shader(File.absolute_path('data/edge_detect.glsl')) # full data path
  my_shader.set('sketchSize', width.to_f, height.to_f)
  start_capture(width, height)
end

def start_capture(w, h)
  @cam = Capture.new(self, w, h)
  cam.start
end

def draw
  image(cam, 0, 0)
  return if mouse_pressed?
  filter(my_shader)
end

def captureEvent(c)
  c.read
end

def settings
  size(640, 480, P2D)
end